gmail account

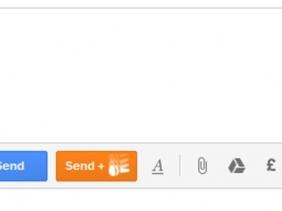
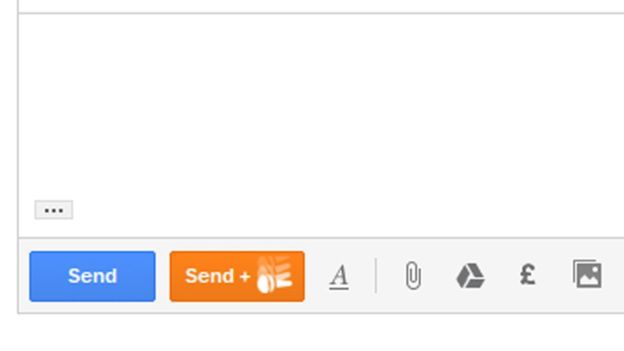
To celebrate the April fools' day with the rest of the world, Google released a new feature that allows users to shut down a long email thread. The button features a minion GIF dropping down a mic, a meme which shows the conclusive part of a statement by dropping the microphone and walking off a stage.

The GIF was removed after a thread of people complains it had cost them jobs and opportunities. 


                                         The orange Send+ button had cost 3 Gmail users their job

According to a user on the Google forum;

"Thanks to MicDrop I just lost my job," claimed one user on Google's product forums.

"I am a writer and had a deadline to meet. I sent my articles to my boss and never heard back from her. I inadvertently sent the email using the MicDrop send button."

"Another complained that they had been having interviews for a job with a company for three months and then accidentally sent a mic drop email to the HR department.

"And a third said that they had sent an "important email to 30 recipients".  

Google has since apologised and removed the feature after complains from Gmail users and also apologised on Gmail help forum

              It looks like we pranked ourselves this year," Due to a bug, the MicDrop feature inadvertently caused more headaches than laughs. We're truly sorry."


                                  The meme shows a minion drops a mic and walk off stage

Google also asked users still seeing the button to restart their gmail account, and the button will be gone.


You can now stop a mail from getting sent to a recipient in Gmail. The latest feature that was recently added to the web gmail version allows a mail to be stopped after you had clicked send. You have between 5-30 seconds to stop it.


The "Undo Send" feature allows users to see a yellow bar after they might have clicked send on their email. The User can stop this email from getting sent if they had made the mistake initially by clicking send.

The "Undo send" feature is not enabled by default, users that wants the feature needs to enable it from their Gmail account.

How To Enable The Gmail Undo Feature

Go to your Gmail account and click the setting gear at the right lower side, just above your mails.

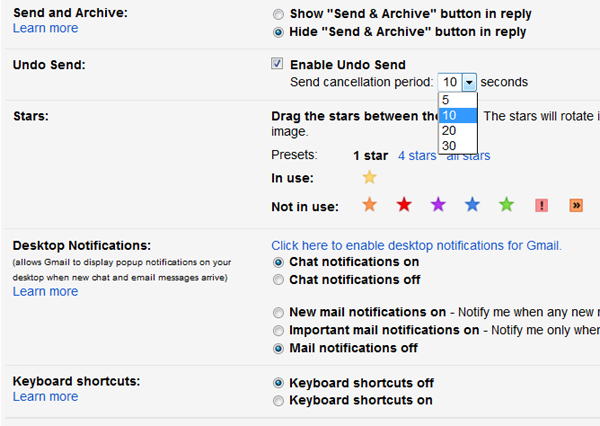
Click "Settings", and in the general tab you will find the "Undo Send" feature.

Choose the timeframe you want to have to stop an email from sending.

Click on "Save Changes" and you are good to go.

Now, anytime you send an email, you will find an "Undo" button that allows you to automatically recall your mail.

Google has got one of the most strongest network, and even though we do hear of series of attacks on their servers, i have never seen them shut down for a day in a long time.Though they once shut down because of a code error, not hacks. No matter how strong Google servers are, it wont protect you from loosing your password if you are careless with them, Its like saying "Jesus is my Savior, and you decided to sleep on a railway line...well that fine" Just please toss out your computer and your ATM, please include the pin too...Thank You...So no matter how secure their servers are, they can only provide us with tools to be safe,and the rest is with each individual. One of the tools provided is the 2-ways verification.

If you have been following this blog in a long time, you noticed we once wrote how to protect your drop box with 2 ways verification. I received a lot of likes on that on FB and its comments are fine too. So i came across 2-ways verification when i suspected some missing mails in my inbox. (Once in a while, its good to check your recent activity) .Checking your recent activity will display IP addresses of where you accessed your account and other information. So i got information my account was accessed from a location i have not been to in years and i was surprised..so i decided to lock it up with 2 ways.

2-step verification allows Google to send you a code number to your phone if someone somewhere is accessing your account from a computer of device you don't never used or its suspecting a foul play.

The first time you sign up for 2 ways, it ask if you trust your current device/computer, you say Yes...and that's all..Any other device that needs login will need to have a code that will be sent to the mobile phone you provided..Its 6 random numbers for every login. Note : You wont receive alert message on that computer you already trusted...

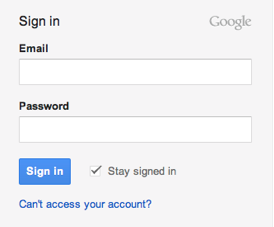
1. Go to the sign-in page and enter your username and password like you normally do.

            Google's new sign-in page

2. Then you’ll be asked for a six-digit code, which you'll get from your phone. If you want, when you enter your code, you can choose to trust your computer -- this means you won't be asked for a code again when you sign in from this computer. If you sign in from another computer, however, you’ll be asked for a code.


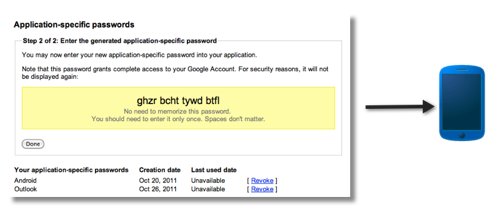
                            image of application-specific password to phone


3.   After you turn on 2-step verification, non-browser applications and devices that use your Google Account (such as the Gmail app on your phone or Outlook), will be unable to connect to your account. However, in a few steps, you can generate a special password called application-specific password to allow this application to connect to your account -- and don't worry, you'll only have to do this once for each device or application.

HOW TO SET UP 2 STEP VERIFICATION


1. Sign in to your Google Account settings page by clicking on your name or picture in the upper right corner of the screen and then clicking Account.
   

2 . On the left tab, click Security and then Edit under "2-Step verification." This will bring you to the 2-step verification settings page.

3. You will then see a step-by-step guide which will help you through the setup process.

4.Once you’re done, you’ll be taken to the 2-step verification settings page again. Be sure to review your settings and add backup phone numbers.

5. You’re done! Next time you sign in, you’ll receive an SMS with a verification code

Forms basically can be used to organize simple quizzes or online polls, and it could also be used to get information for online surveys and other things you can think of using forms to do.

People that doesn't have the knowledge of online forms have always used Microsoft word for allowing users to help fill out there forms.

But in this simple tutorial, i will explain to you how to use an online form free and putting it on social websites to give access to not just your friends, but to everyone that is interested in filling out the forms. I am introducing to you Google Online form

To create a form, all you have to do is sign in to your Gmail account


If you already signed in to your Gmail account, click on this LINK

    create google form

Fig. 2

Click on the create button, you should see the drop down list as in fig.2

Click on Form, and Google will present you with different Templates. This templates will give your form a nicer look when you apply it, it appear at the background of your form, you can choose different templates from Google.

After that is the done, the next thing is creating your questions

Fig 3

Let me break it down for you since i believe you are reading to learn about the form

The first text box is to tell everyone about your form; you can simply write something like

Question About Opening a Restaurant,  This box is the Form Title.... don't miss it

The next text box is a brief description about the form, just to let people know the main objectives of having them fill the form..I will say its optional, but i will fill it out if i need to get more responses.

Question Title

The next is text box is where you start asking questions, the questions you like people to answer.

Example : what is your gender?

Help Text

This is just a box to give people the idea of how you want them to answer that particular question

Question Type

This is the response you need from people, it comes in 7 different format

Text : If you want people to write out the answer.....like, what is your name?

Paragraph Text : Use this if you want a longer text from users filling out the form. You use this when you need story line....smiley

Multiple Choices : Use this type when you need your form to go to a new page based on user selection.

Hint: Let assume you have created 3 forms already based on different mobile phones, and on first form you have this

Please Choose Phone Manufacturer

Nokia

iPhone

HTC


And you want users of iPhone to switch to another set of questions that relate to iPhone and Nokia users to skip to another page relating to their phone...This is the format you use.

Checkboxes : This allows you to allow users choose multiple answers incase you have different choices of answers you want them to choose.

Choose from a list : Just like Multiple choices, the only difference is users will choose from a list, ...you can use Choose from a list or Multiple choices... Its your call

Scale:  This is like you asking your friends, on a scale of 1-5 or 1-10... So you have two options and ask them to choose on a scale between those 2 options.

Grid : It allows you to have a row and column, so just like Scale, but here you can have different options and make users choose from them

 
*Required Question: As the name suggest, click this checkbox if you want that particular question to be answered before user can submit the form. It place a red mark alerting users that they need to answer that particular question

Click DONE, when you are satisfied and click on Add ITEM to add a new question

Confirmation Page

Fig 4

When you are done asking questions, the next thing to do is the confirmation message. You can appreciate your friends by putting your vote of thanks here or leave the default response message.

Sharing

For users to be able to be able to access this form, we need to share it, right?

To allow access to the form, click on FILE on the top left of the form and select, E-mail collaborators , You will see different option that will allow you to share it across multiple social media websites like Google +, Facebook, twitter and so on.

Also if you want some particular users to have access to the form, if they need to add or edit anything, this is another side of the form to add them. Originally, you are the owner, but you can give permission to anyone you like to authorize

The last thing here is, you can email different people about this form, this is so useful if you you have people working on  your project and you need to collect their data all at once, this is the best thing to do, moreover, they don't need to be a Gmail user, since they only need a link that will give them access to your form.

Hope this helps you create an online form now, funny thing is, you can use the Google form as a Contact Us page on a website.= I see people do it, that is why am telling you.

 Please we will appreciate your comments/Questions Via the comment text box below.

Hello…Today I will be sharing something funny but educative to lovers of my blog..  Sometimes last week, I have this phobia of someone watching my every steps or what I do…its quite funny, sometimes I placed stuffs and see if someone moved them a bit…yeah it’s a phobia, I checked online now…..

So as a tech guy, I was thinking maybe someone is about to steal from my room, so I decided to plant a surveillance camera into my room…but it might cost me much time and money , and I want to catch this person red-handed…so after much thinking, I decided to use my Computer to track down this fella, if it’s a criminal or government agent…hahahahha….am a good kid…You all know that…

So I decided to use my webcam to do this trick by downloading the Cyber link You Cam 5, many of you have this software, but I guess you yet to explore its power…


It’s a powerful web-cam software you all should get, because you can use it for numerous things….things like

 Log on to your Computer with face-Log-on technology

 Log-On to websites that accepts face-log on including your bank website..some also includes:

  Facebook

 Google

 Yahoo

 YouTube

 Amazon

 eBay

 Flickr

 Twitter

 Blogger

 AOL

DirectorZone

 MoovieLive

 And many more................

 For Online presentations and lot more…check out their website or explore the software if you already have it...

 How To Turn your Computer to a surveillance Camera 

 So I decided to catch this thief or Unknown person after me…. I purchased the software online on a Wednesday and set it to motion…


Installation

 The installation of this software is quite easy if you are not a novice. And in a matter of time you done.

 Web-Cam Surveillance

 YouCam surveillance feature of this software lets you set your webcam to start recording at a particular time (Maybe when someone hinted you that a stranger do come to your house when you are at work…you can allow your computer to start recording at this particular time )…

Motion Detection

 Yeah…this is what I am talking about, because it makes me feel like James Bond 007…This is the feature I preferred…it records immediately it detects motion…so with this, it was quite easy since I have just one way to my room, I set my Cam facing my door, and set the time and date, which I kept inside a note on my smartphone in case someone tampered with those information…so when I leave my room…I am so much happy nobody can break in without getting caught..

 Now some of you will think what about if the intruder steals my laptop….hahahha….yeah you right, but there is an automatic e-mail that will be sent to you immediately it detects a motion….which I can check on my smart phone immediately since it synchronizes with my mails…

 You can also use this to monitor your pets when you are away…..but I don’t have a pet…am looking for that intruder


Hey someone should call 911....i caught him...i just caught the intruder

Set Up Surveillance

If you just downloaded the software, you can set up your surveillance with this steps

Open your Cyber link YouCam software on your computer

You have 3 Tabs, Effects :::Presentations::: Utilities ::::

Choose Utilities, and from the drop-down, choose Surveillance..

You will have 3 options to choose from

Motion detection recording (I prefer this if you just want to catch a glimpse of something strange)

Continuous Recording : This will keep recording, as long as you set your recording end time ….it will help track down movements, probably of a pet..or a kid at home while you are at work J

Time-Lapse: This will take snap shot every particular time you set it to do so…


Yes and you done..

Another option of you like to receive an email: There is an option for Auto-email, where you can insert your email address…Your SMTP host…You can check different SMTP settings online…

If you are using Gmail: This is your settings

Smtp host: smtp.gmail.com

Username: Your Gmail address

Password: Your Gmail password

Port :465

If you use other mail providers, please search online…I am #TeamGmail…(if that even existed)

Leave other settings and you good to go….You can also test this before using it finally….

Thanks for reading


Categories: